Let’s face it – not all tushies are created equal, and that means there is no one size fits all bicycle seat. In fact, that’s why there are so many different seats on the market. So, you’ve gone and shopped, found the perfect seat for you, and made your purchase. But now, you’re faced with going home to fit the bicycle seat to your bike, and you aren’t quite sure what to do. Rest assured that fitting a bicycle seat is one of the easiest things to do when it comes to customizing your bicycle.
Table Of Contents
Why Change the Seat

As mentioned, there are several reasons you may choose to switch out the existing bicycle seat for a new one. Often, you’ll find that, if you’ve ever injured your tailbone, sitting on a standard bike seat is extremely uncomfortable. You need one that is a bit plusher and offers some cushion and having a wider seat that keeps the pressure off your tailbone can be a real help in giving you the proper seating position for longer rides without starting to struggle with discomfort.
Racers tend to want custom seats. They need to maintain the light weight of the bicycle that allows for a faster ride, as well as a streamlined profile. That means the seat can’t be too wide or too heavy. Often, just as they tend to customize their bicycles for racing to keep the weight minimal and the gears set to shift quickly, they also customize their seats. This is almost necessary because often, they need a seat that is streamlined while also being lightweight and comfortable enough to support them over long distances without causing any sort of pain. By the same rights, marathon riders need seats that won’t become uncomfortable over longer periods of time. For those who go mountain biking or participate in bike tours, fitting the proper bicycle seat means being able to deal with the rough ride, so having a softer seat that doesn’t leave bruising and soreness is important.
What You’ll Need
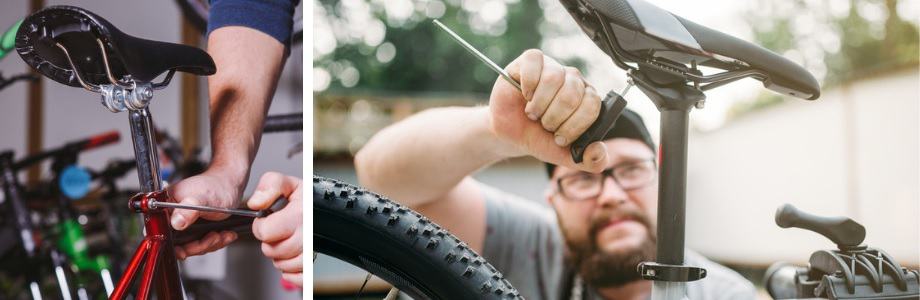
The first thing to do when starting any project is to gather the tools you’ll need. You don’t want to be in the middle of working on it and realize you have to go seek out a hammer or screwdriver. So, before we dive into the meat and bones of the process, here’s a list of the tools required for fitting a bicycle seat (and removing the one you have).

- An Allen wrench – sizes vary by bike, but try a 5 mm first and determine the right size from there (it might be in your interest to have an entire set available at the ready)
- 15 minutes to an hour, depending on your skill level
That’s it. Obviously, this is a very simple task that requires much less effort and far fewer tools than most tasks you’ll encounter when customizing your bicycle. Now, once you have the tools in hand, consider the first step needed to replace your existing bicycle seat.
Removing the Existing Seat
You’ll start the job by removing the bicycle seat you have in place. Take a moment to see if you have one or two Allen bolts holding the seat in place. This will make a difference as to how you go about removing it.
- Use the appropriately sized Allen wrench to loosen all bolts underneath the seat that hold the clamp in place, turning counter clockwise.
a. If there is a single bolt, you’ll loosen it until you can turn the clamp. Turn it 90 degrees, and then you can remove the seat.
b. For clamps with two bolts, you’ll have to loosen the bolts until you can remove them both. Then, slide the seat rails completely free of the clamp to remove.

Now, you’re ready to install the new seat.
Installing the New Seat

- Now, insert the rail of the new bicycle seat into the grooves at the bottom of the seat post clamp. Take time to adjust the top of the clamp on the rails so that it’s properly aligned.
- Tighten the Allen bolt or bolts slightly, making sure the hardware is firmly in place and won’t slip, but don’t lock them down all the way.
At this point, you’ve set yourself up to fix the bicycle seat to your liking and can take the next step for installation.
Adjusting the Bicycle Seat
Just like office chairs, bicycle seats are adjustable to assure you get the fit you want. The first thing you want to set up is the seat position.
- Start by sliding the seat rails closer or further away from the front of the bicycle. This will change the reach toward the handlebars and allow you to ride comfortably without stretching too far or feeling cramped. You can test the reach by carefully straddling the seat and putting yourself in a position similar to the way you ride.
- Once you have an idea where you want the seat, it’s time to adjust the tilt of the seat to your particular comfort level. You can angle it up or down, until you feel like it’s where you need it to be to ride without issue.

3. Once you’ve set the seat, you’ll want to tighten the bolts, so the bicycle seat stays in place. A seat with a single bolt on the clamp is simple. However, if you have two bolts, start by alternately tightening each bolt halfway. Then, go back and tighten them all the way. Switching back and forth will keep everything more even for a better seating experience.
If It’s Still Not Right

If the adjustments you made still don’t seem to fit right, it’s not a big deal. As you can see, the adjustments were easy to make during installation, and since you only have to loosen the bolts to make more adjustments rather than removing them or the seat completely, making additional tweaks to the settings is a breeze.
Conclusion
There are a lot of jobs involved in a customized, comfortable bicycle that are tedious and difficult, which may warrant the notion of putting them off till a later date, especially if you aren’t involved in marathons or racing. However, the idea of riding on an uncomfortable seat is a bit daunting to anyone, regardless of the purpose of your riding. Because it’s such an easy task, there’s no reason to put it off, especially if you’ve already gone out with your existing seat and found it leaves you sore or bruised, or that you have problems with back and arm muscles because the reach is poor. Take the time to really seek out the perfect seat for your needs and realize that the cost of whatever seat you choose is well worth the investment.
Then, take the few minutes you need – and the extremely inexpensive tools required – to make the change. You’ll find that your ride is much more pleasant, and that you’re much more likely to want to go out, whether for pleasure or for training. Have a professional help you choose your seat and test them out before buying so you know you’ve made the right choice to assure that you’ll be satisfied with your decision for several years to come.